This article is a part of:
Introduction
While running GNS3 inside Orbstack, I encountered an issue with Orbstack’s networking system that prevented my localhost from communicating with GNS3 appliances. Instead of spending more time troubleshooting something that is limited by its design, I decided to deploy a cloud-hosted network lab using PNETLab.
The lab infrastructure is provisioned using Terraform and remote access to the lab is secured through Tailscale instead of exposing it directly to the Internet.
This article covers the deployment process. The remote access setup will be covered in a separate article.
Goals
- Build reusable PNETLab server with Terraform.
Prerequisites
- GCP & Tailscale accounts.
- GCP CLI installed.
- Terraform installed.
Architecture Overview
Here’s an overview of what we’re going to build:
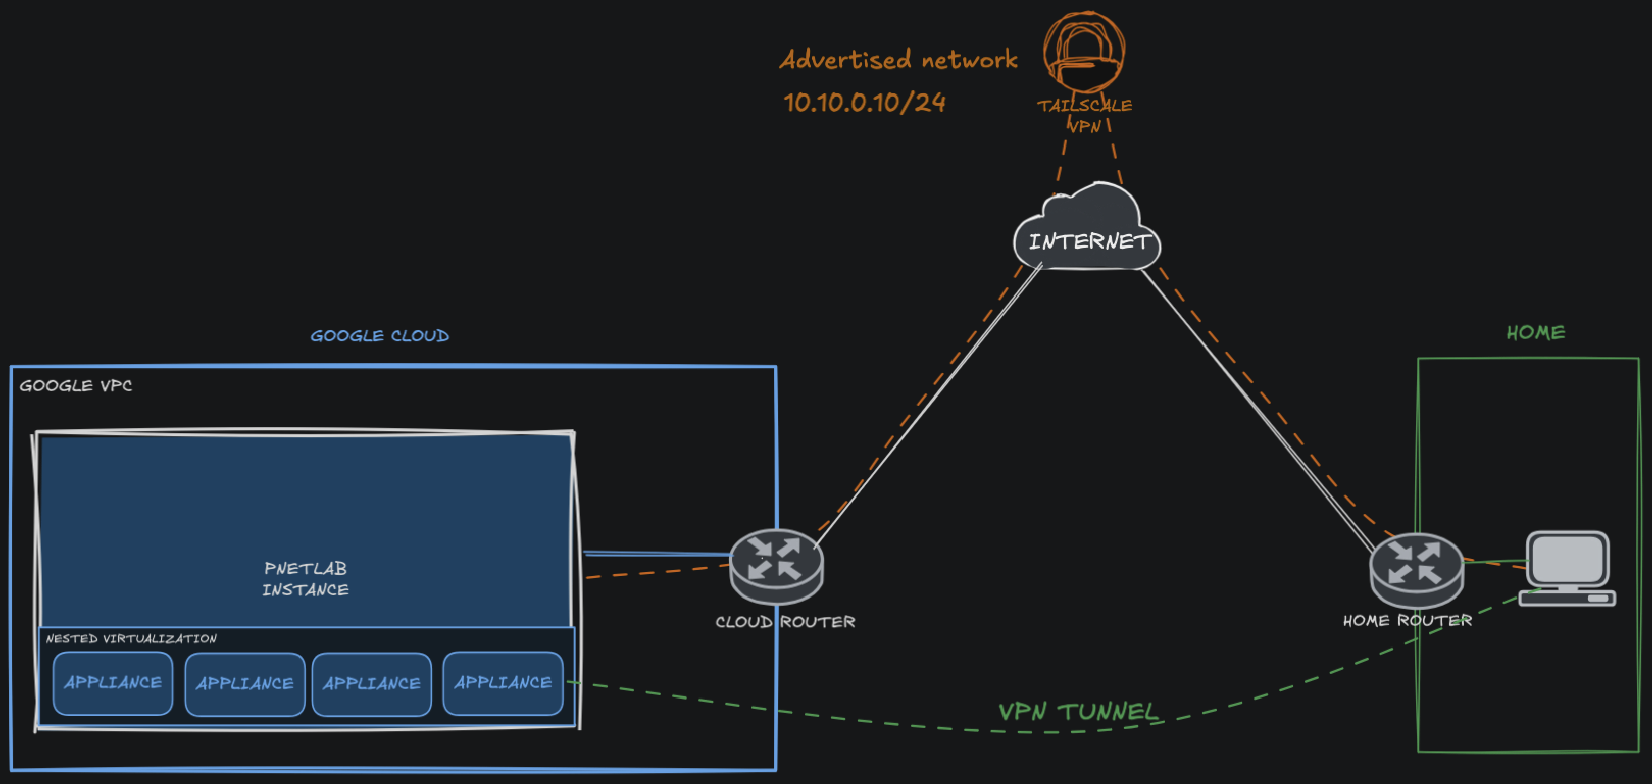
The setup consists of:
- Terraform for infrastructure automation.
- A GCP compute instance running PNETLab.
- A private VPC network.
- Cloud Router for outbound internet access (dynamic IP).
- Tailscale for secure remote access to PNETLab instance
Prepare the GCP Environment
Before we begin, several prerequisites need to be prepared within Google Cloud Platform.
Note: I’m using GCP’s free trial credits for this setup, if you’re on a paid account, the steps remain the same.
GCP Authentication
Terraforms requires credentials to access your Google Cloud resources. There are several methods for this but I will be using Application Default Credentials (ADC) method for this personal project.
From CLI, run the following:
$ gcloud auth application-default loginA browser window will pop ups, requesting for Google account authentication. After a successful authtentication, the credentials will be stored in the default location and Terraform will look into it automatically.
Creating a GCP Project
First, create a new project for our PNETLab deployment using GCP CLI.
$ PROJECT_ID=pnetlab-$RANDOM
$ echo $PROJECT_ID
pnetlab-xxx
$ mkdir $PROJECT_ID
$ cd $PROJECT_ID
$ gcloud projects create $PROJECT_ID
$ gcloud config set project $PROJECT_ID
Then, link the project to your billing account.
$ gcloud billing accounts list
ACCOUNT_ID            NAME                OPEN  MASTER_ACCOUNT_ID
AAAAAA-BBBBBB-CCCCCC  My Billing Account  True
$ gcloud billing projects link $PROJECT_ID --billing-account=AAAAAA-BBBBBB-CCCCCC
Enabling Compute Engine API
To allow Terraform to manage VM resources, we must enable the Compute Engine API.
$ gcloud services enable compute.googleapis.comServer Deployment with Terraform
We will use Terraform to provision our server that will host PNETLab.
Preparing Project Structure
Create the following project structure.
$ tree
.
├── README.MD
└── terraform/
    ├── terraforms.tfvars # sensitive informations goes here (project_id, region, user/keys)
    ├── main.tf # defined gcp resources
    └── variables.tf

1 directories, 4 files
terraform.tfvars
terraforms.tfvars contains the following:
project_id      = ""
region          = ""
zone            = ""
os_image        = "projects/ubuntu-os-cloud/global/images/ubuntu-1804-bionic-v20240116a"
Other than os_image, make your adjustment. We use older Ubuntu because the PNETLab core service
main.tf
main.tf file contains the following:
terraform {
  required_providers {
    google = {
      source = "hashicorp/google"
    version = "~> 4.5" }
  }
}

provider "google" {
  project = var.project_id
  region  = var.region
  zone    = var.zone
}

# SETUP NETWORK #
resource "google_compute_network" "pnetlab_vpc" {
  name                    = "pnetlab-vpc"
  auto_create_subnetworks = false
}

resource "google_compute_subnetwork" "pnetlab_subnet" {
  name          = "pnetlab-subnet"
  network       = google_compute_network.pnetlab_vpc.id
  ip_cidr_range = "10.10.1.0/24"
}

resource "google_compute_firewall" "allow_ssh_access" {
  name    = "allow-ssh"
  network = google_compute_network.pnetlab_vpc.id

  allow {
    protocol = "tcp"
    ports    = ["22"]
  }

  source_ranges = [ "0.0.0.0/0" ]
}

# NAT
resource "google_compute_router" "pnetlab_router" {
  name = "pnetlab-router"
  region = var.region
  network = google_compute_network.pnetlab_vpc.id

}

resource "google_compute_router_nat" "pnetlab_router_nat" {
  name = "pnetlab-router-nat"
  region = var.region
  router = google_compute_router.pnetlab_router.name
  nat_ip_allocate_option = "AUTO_ONLY" # use dynamic public ip for nat
  source_subnetwork_ip_ranges_to_nat = "ALL_SUBNETWORKS_ALL_IP_RANGES" # nat any sources ip range available within the vpc

}

# SETUP EXT DISK #
resource "google_compute_disk" "additional_disk" {
  name   = "pnetlab-additional-disk"
  type   = "pd-standard"  # Choose disk type (pd-standard, pd-ssd, etc.)
  size = 50
  lifecycle {
    prevent_destroy = true
  }
}

# SETUP INSTANCES #
# ubuntu-1804-bionic-v20240116a                                 ubuntu-os-cloud      ubuntu-1804-lts
resource "google_compute_instance" "pnetlab_server" {
  name         = "pnetlab-server"
  machine_type = "n2-standard-2"
  tags         = ["pnetlab"]

  boot_disk {
    initialize_params {
      image = var.os_image # cloud image
      size  = 20                 # assign 20gb
      type  = "pd-standard"
    }
  }

  # external disk 50gb
  attached_disk {
    source = google_compute_disk.additional_disk.id
  }

  network_interface {
    network    = google_compute_network.pnetlab_vpc.id
    subnetwork = google_compute_subnetwork.pnetlab_subnet.id

    # Disable public IP
    # access_config {
    #  network_tier = "STANDARD"
    # }
  }

  scheduling {
    automatic_restart           = true
    on_host_maintenance         = "MIGRATE"
    preemptible                 = false
    provisioning_model          = "STANDARD"
  }

  advanced_machine_features {
    enable_nested_virtualization = true
  }

}
This configuration provisions:
- Custom VPC network.
- Subnet.
- Firewall rules.
- Cloud NAT router.
- Additional persistent disk.
- Enabled nested virtualization (need machine type that support nested virtualization).
There’s also n1 for alternative machine type if you worry about the cost, lets say n1-custom-1-2048, which means machine type is n1 with single core and 2 GB of RAM.
variables.tf
variables.tf define the variables we used in the tfvars file, it contains:
variable "project_id" {
  type        = string
  description = "Project ID"
}

variable "region" {
  type        = string
  description = "Project region"
  default     = "us-central"
}

variable "zone" {
  type        = string
  description = "Project zone"
  default     = "us-central1-a"
}

variable "os_image" {
  type        = string
  description = "OS family"
}
VM Deployment
Within the terraform folder, initialize the terraform working directory.
$ terraform initThe init step only needs to be performed be performed during the first deployment or after provider/module changes.
With all the resource files defined, we can start the deployment.
$ terraform fmt         # Format your Terraform files
$ terraform validate    # Check for syntax errors
$ terraform plan -out pnetlab-deploy       #Preview the infrastructure changes
$ terraform apply pnetlab-deploy  # Deploy the resources
Verify Deployment
After it finishes, check if the instance is running:
$ gcloud compute instances list --filter="name=pnetlab-server" --project="$PROJECT_ID"Please mind that the terraform config I provide here is only reusable for personal project, it’s not reusable for team scale project.
PNETLab Installation
Install PNETLab
SSH into the instance using gcloud cli.
$ gcloud compute ssh INSTANCE_NAME --zone=YOUR_ZONEAdd pnetlab repository with the following command.
$ echo "deb [trusted=yes] http://repo.pnetlab.com ./" | sudo tee -a /etc/apt/sources.listUpdate the repository and install pnetlab.
$ sudo apt-get update
$ sudo apt-get install pnetlab
During installation process, you might be asked to replace kernel configuration like this
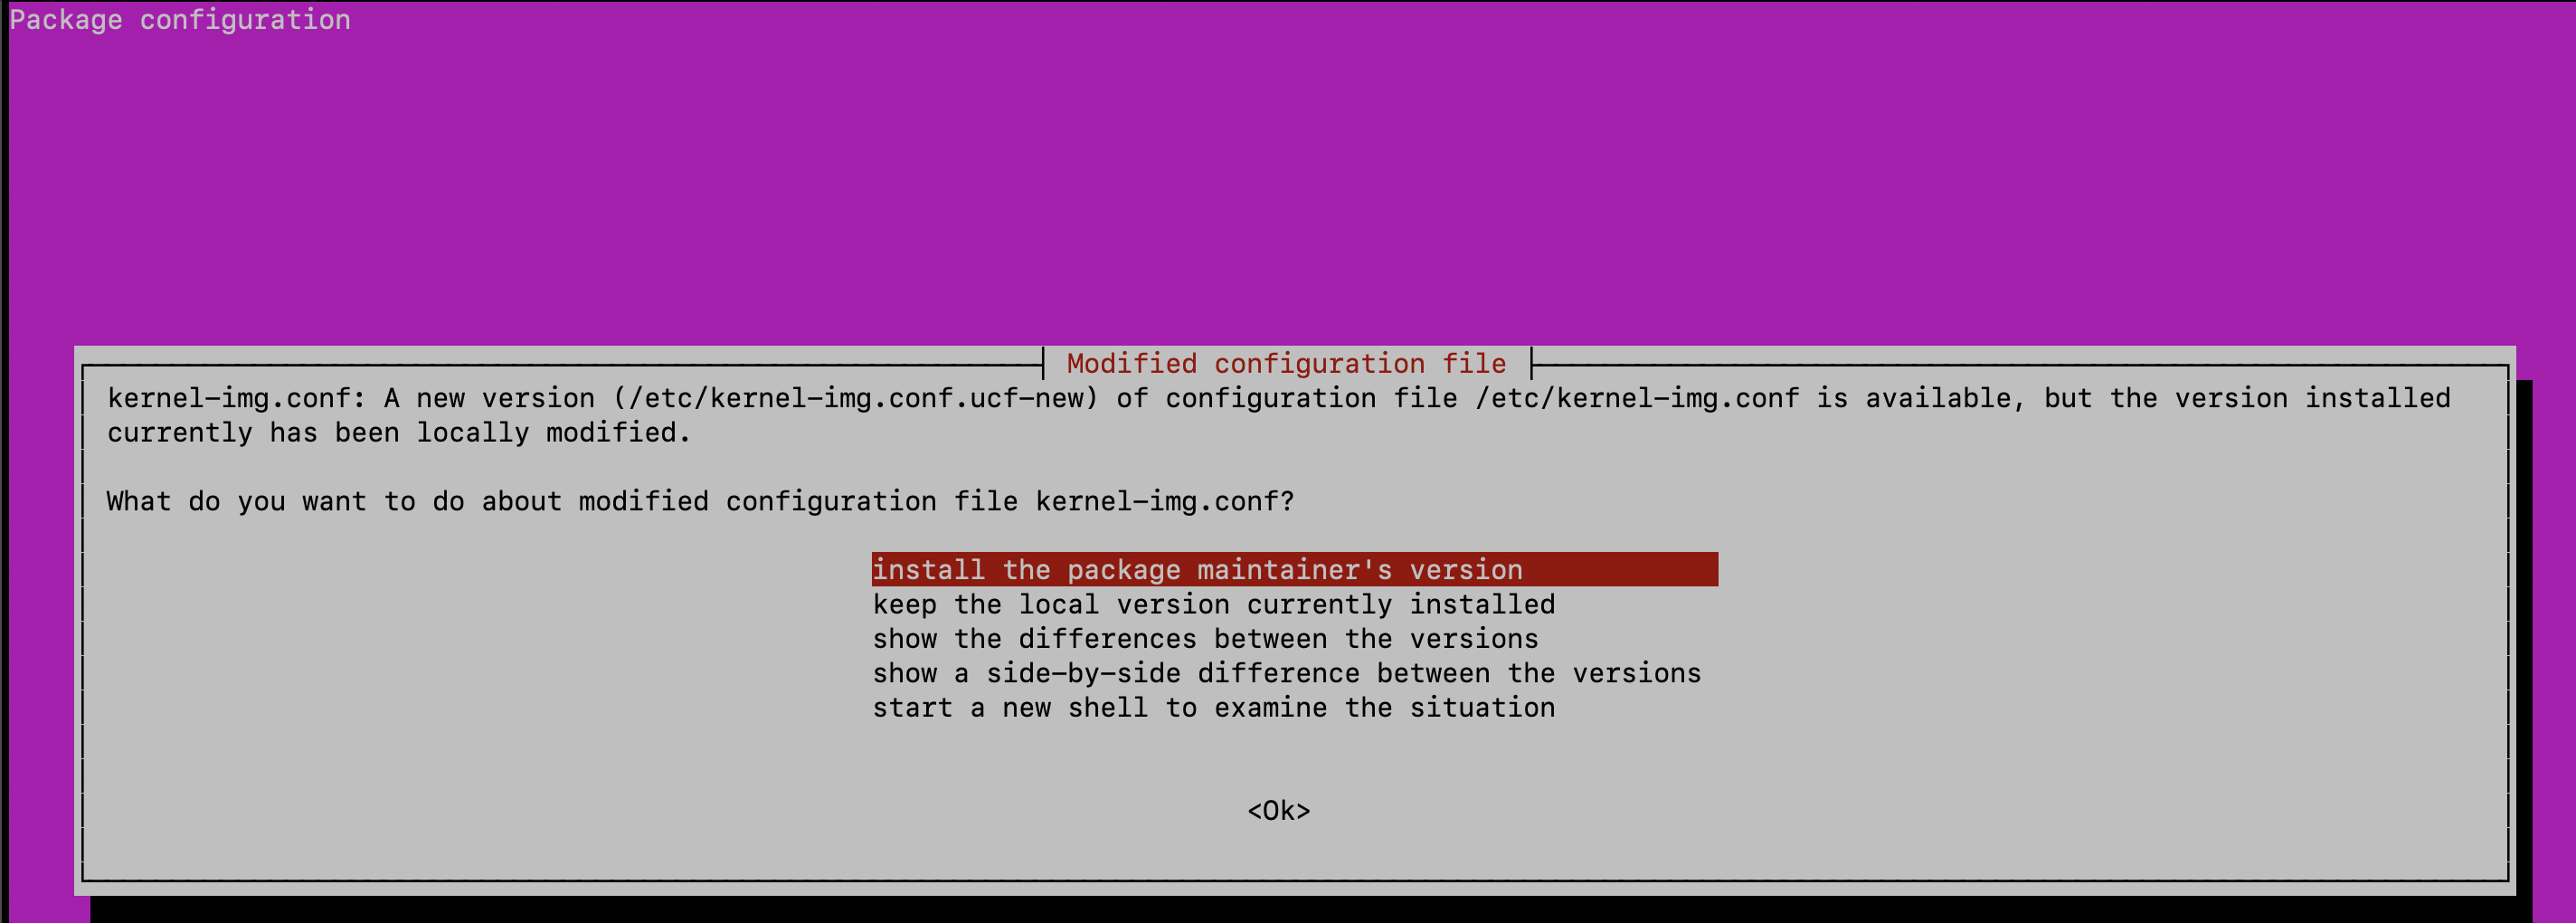
Just go with it and continue the installation.
Once it finished, you will have a name resolution/DNS issue, but that’s fine for now.
Server Configuration
Swap
Create a swap disk, allocate the size according to your need.
$ sudo fallocate -l 1G /swapfile
$ sudo chmod 600 /swapfile
$ sudo mkswap /swapfile
$ sudo swapon /swapfile
$ sudo cp /etc/fstab{,.bak}
$ sudo '/swapfile none swap sw 0 0' | sudo tee -a /etc/fstab
DNS
Edit file /etc/network/interfaces add line dns-nameservers 8.8.8.8 to the configuration of interface pnet0.
...
# The primary network interface
iface eth0 inet manual
auto pnet0
iface pnet0 inet dhcp
    dns-nameservers 8.8.8.8
    bridge_ports eth0
    bridge_stp off
...
And restart the networking service.
$ sudo service networking restartDisk
Time to add the additional disk we defined in the terraform resource. The purpose of this disk is to store all the pnetlab project files as well as the images later. We can preserve the lab data in this disk in case the VM need to be replaced/gone wrong, we will get into the detail later.
In my case, the additional disk is available at /dev/sdb.
$ sudo lsblk
NAME    MAJ:MIN RM  SIZE RO TYPE MOUNTPOINT
loop0     7:0    0 40.4M  1 loop /snap/snapd/20671
loop1     7:1    0  368M  1 loop /snap/google-cloud-cli/203
loop2     7:2    0 63.9M  1 loop /snap/core20/2105
sda       8:0    0   20G  0 disk
├─sda1    8:1    0 19.9G  0 part /
├─sda14   8:14   0    4M  0 part
└─sda15   8:15   0  106M  0 part /boot/efi
sdb       8:16   0  100G  0 disk # External Disk
We’ll create an LVM disk out of it.
$ sudo vgcreate /dev/vg01 /dev/sdb
$ sudo lvcreate -l 100%FREE --name lv01 vg01
$ sudo mkfs.ext4 /dev/vg01/lv01
Then we set a mount point for the volume we just created at /mnt/unetlab
$ sudo mkdir /mnt/unetlab
$ sudo mount /dev/vg01/lv01 /mnt/unetlab
Edit the /etc/fstab file and add the following line to mount /mnt/unetlab on boot:
/dev/vg01/lv01 /mnt/unetlab ext4 defaults 0 0Now we’ll create a new directory for PNETLab project files and image files in our newly mounted disk.
$ sudo mkdir /mnt/unetlab/addons
$ sudo mkdir /mnt/unetlab/labs
Next, we’ll remove the old directories for project files and image files, and replace them with symbolic links pointing to the new directories on the mounted disk.
$ sudo rm -rf /opt/unetlab/addons/
$ sudo rm  -rf /opt/unetlab/labs/
$ sudo ln -s /mnt/unetlab/addons/ /opt/unetlab/
$ sudo ln -s /mnt/unetlab/labs/ /opt/unetlab/
Change ownership of the new labs directory to ensure PNETLab’s services can access it back.
$ sudo chown -R www-data:www-data /mnt/unetlab/labs/Grub
Remove the default grub config.
$ sudo rm /etc/default/grub.d/50-cloudimg-settings.cfg
$ sudo update-grub
Restart Server
To complete the installation, restart the server.
$ sudo rebootOnce you logged in, there will be a pop up asking for setting root password, hostname, and NTP. Configure these according to your preferences.
We also need to make sure that the internet connectivity is working with simple ping check to 1.1.1.1.
Verify Installation
Since the server configured without a public IP address, the PNETLab web interface cannot be accessed directly from the internet. The installation can be validated locally using curl from the server.
$ curl -k https://localhostExpected output:
HTTP/1.1 301 Moved Permanently
Date: Thu, 28 May 2026 15:02:55 GMT
Server: Apache/2.4.29 (Ubuntu)
Access-Control-Allow-Origin: *
Access-Control-Allow-Headers: *
Location: /store/public/admin/main/view
...
Update Version (Optional)
After the installation completed, we can directly upgrade PNETLab to the latest version. It’s an optional, so I will just put the official guide link on how to upgrade the lab version: go here.
Troubleshoot
I know things that may go wrong before you finish it, so there are a few problems I encountered and the solutions.
Cloud Appliance: DHCP not working
Verify udhcpd service is running and enabled.
$ service udhcpd status
$ cat /etc/default/udhcpd | grep ENABLED
Set to enabled and restart to see if it’s working.
Conclusion
We have completed the deployment process of PNETLab server on Google Cloud using Terraform. At this stage, the lab is running internally but remains inaccessible from outside the private network.
In the next article, we will configure Tailscale to provide secure remote access to the lab.